A WPUniversity reader asked:
How do I make sure my images are retina ready?
Another question first: What width do I set my large images to if I want them to be able to popup larger when clicked? I know I should set the large to be the full width of the theme but what if I change themes?
for retina ready use:
http://retinajs.com/ or
http://wordpress.org/extend/plugins/wp-retina-2x/image file size to upload? dpi?
Thanks for your questions.
Before we answer your questions, it’s important that we get a strong understanding of What a Retina Ready Image is. If you need a refresher, give that article a read and then come on back.
Now that we have an understanding that a Retina image is basically a normal image with double the pixels (making it HD!), let’s answer your questions in order:
- To make sure your images are Retina ready for your WordPress site, we recommend you use the WP-Retina-2x plugin. After you install the plugin and activate it, all you need to do is upload your images normally and the plugin will automatically create a retina ready version. When the plugin detects a Retina display, it will serve up the Retina image. For answers to FAQs for this plugin, you can try this page.The same rules that apply to regular images apply to retina, in other words, make sure they are as high a DPI as you can and the larger the image you start with, the better.
- When you add an image into a gallery or page you have the option to set the image size. Unless you customize it, a thumbnail will always be 150×150, medium, large and full-size are auto-calculated by WordPress (again, unless you customize that with your theme).
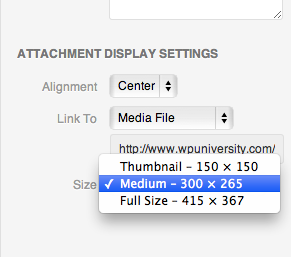
To answer your question, let’s use an example. Say you want to insert an image into a blog post and you want that image to be pop out in a Lightbox when the user clicks it. If that image is uploaded as 500 x 350 and then inserted by selecting the “Thumbnail” size, when the image is clicked, it will pop out at 500 x 350 (make sure “Link To: Media File” is selected). Now, this is only how WordPress acts by default. If you have a lightbox plugin installed, you can adjust these settings manually. Most plugins will even provide you with a set of best practices and instructions. As always, the larger the pixel size of the image you upload, the more options you have with it.A last note, different themes treat images differently. If you change your theme it will not adjust your image files but it will change how they are displayed. If your old theme displayed images by default at 300 x 300 and your new theme does it at 200 x 200 then your images will be automatically shrunk by the CSS for display on your site.
If you have any follow-up questions, please put them into the comments below and we will get back to you ASAP.